How To Write A Blog Post That Ranks High On Google Every Time

Learning how to write a blog post for the first time can feel like trying to hit a moving target.
What should the title look like?
How long should the introduction be?
Should you worry about SEO, or just focus on the writing?
Most bloggers struggle with how to write a blog post that doesn’t just exist, but attracts attention, keeps readers hooked, and ranks high on Google.
Without a clear roadmap, it’s easy to second-guess yourself at every turn.
Now, imagine this.
You spend hours writing, rewriting, editing and formatting your post.
Then you hit publish.
And … Crickets.
No comments, no shares, and no traffic.
It’s frustrating, but it’s also common.
With over 7 million blog posts published every day, most never reach the audience they deserve.
But here is the good news.
Writing a high-performing blog posts isn’t about talent or luck, it’s about following a clear, proven and repeatable writing process.
Whether you’re just getting started or trying to sharpen your skills, this guide I’ll walk you through every step of writing a perfect blog post, every time.
From crafting attention grabbing titles and structuring your posts to choosing fonts, formatting for readability, optimizing for SEO, and using the best AI writing tools, we’ll cover it all, in detail.
This isn’t just another checklist.
It’s a complete masterclass in how to write a blog post.
If you’re ready to stop guessing and start creating articles that actually engage, rank and convert – let’s dive in.
Disclaimer: This article contains affiliate links. If you sign up for a paid plan through my links, I may receive small compensation at no cost to you. You can read my affiliate disclosure by going to my privacy policy. This blog is for informational purposes only and does not constitute financial advice.
How To Write A Blog Post?
Here are the simple steps that you need to take if your goal is to write blog posts that rank high on Goolge, every time.
1. Your blog title is your first impression
2. Writing irresistible introductions
3. Crafting body content that delivers
4. Visual elements that make a difference
5. SEO optimization
6. Call-to-action that converts
7. Research and planning
8. Writing tools and software
9. Editing and proofreading
10. Conclusion that leaves lasting impression
11. Blog post publishing and performance tracking
Final thoughts
Recommended articles
We’ll begin by breaking down the ideal blog post structure, so that later on everything from planning and topic research to SEO becomes easier and more strategic.
And if you haven’t started your blog yet, you can get up and running in minutes with a reliable hosting provider like Bluehost.
It’s beginner-friendly, affordable, and comes with everything you need to start a blog today.
1. How To Write A Blog Post Title?
Before anyone reads your blog post, they read one thing, the title.
In a world where attention span is shorter than ever, your article title is your first impression and sometimes the only chance to grab your reader’s interest.
So, mastering how to write a blog post that performs well, starts with the title.
It isn’t just a creative label, it’s also a SEO signal.
Therefore, your title needs to do it all, attract, inform, and perform.
Let’s break down how to make this happen.
Title Lenght
Your title needs to be short enough to display fully in search engines, but long enough to be informative and compelling.
Ideal Character Count: Aim for 55–70 characters.
Why?
Because Google displays up to 70 characters in the search engine results page (SERP).
Go too long, and your title gets cut off; go too short, and you may miss SEO-rich terms or impact.

Ideal Word Count: The sweet spot is 6 to 12 words.
This range is long enough to include keywords and modifiers, but it’s not overwhelming.
Use a tool like the Yoast plug-in to preview how your title will look in Google search results.
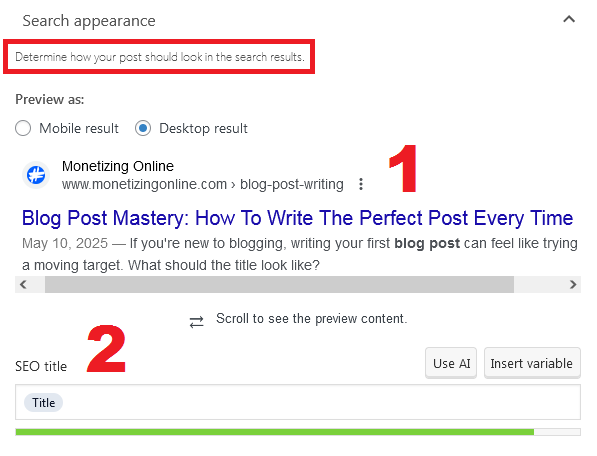
SEO Tip When Learning How To Write A Blog Post: Alway front load your keyword or at least make sure that it appears within the first 5 words of your blog post title.
Title Structure That Works
Your title should satisfy both the search engine algorithm and the human readers scanning the search results.
Here is a proven pattern for crafting great titles that attract clicks.
Use Power Words
Using power words in your post titles is one of the most effective ways to grab attention, and increase engagement.
Words like “Proven”, “Ultimate”, “Now” or “Simple” tap into emotions and curiosity, two things that drive clicks.
SEO-wise, they can also help with “long-tail keyword” variants.
They promise value.
Examples:
Without power words:
- Tips for Saving Money on Groceries
With power words:
- 10 Proven Hacks To Instantly Slash Your Grocery Bill
Which title are you more likely to click on?
Your goal it to include at least 1 power word in your headline.
Use Emotional Words
Emotional words are essential if you want your title to connect with the readers.
These are words such as “Fearless”, “Hidden”, “Truth”, “Exposed”, “Mistakes”, or “Warning”.
Examples:
- The Hidden Traits Of High-Paid Professionals.
- 7 Job Interview Mistakes That Could Cost You The Offer.
If you’re wondering how to write a blog post heading that drives more clicks, emotionally triggered titles are a powerful strategy.
Strive to include 1-2 emotional words that take 10-20% of your title length.
Use Common Words
Common words make titles readable.
A blog heading full of power and emotional words only can feel artificial or spammy.
Common words like “How,” “The,” “You,” “To”, etc. provide structure, so readers understand what the title promises.
They also help match search intent, users naturally search with common words “How to,” “Best way to,” or “Tips for”, hence including them improves SEO.
Examples:
Without common words (unnatural):
- Ultimate Strategies Crush Credit Card Debt.
With common words (balanced and clear):
- 10 Ultimate Strategies To Help You Crush Credit Card Debt.
Headlines with 2-3 common words are more likely to get clicks.
Use Uncommon Words
Uncommon words like “Time”, “Archetype”, “Paradigm” or “Harness” can be very effective in blog titles, if used strategically.
They differentiate your blog post title in a sea of generic content, and pique curiosity, which increases click-through rates, if the word is specific to your niche or audience.
When learning how to write a blog post title that stands out, remember that uncommon words should be used in moderation and paired with more familiar, search-friendly terms.
Examples:
- How To Manage Your Time For Maximum Productivity And Success.
- 7 Archetypes Of Highly Focused People And How To Emulate Them.
If the word is too obscure, it may confuse the readers.
Rare words can hurt SEO if they don’t match what users actually search for.
Don’t sacrifice understanding just to be unique.
Sentiment
The overall title sentiment plays a huge role in how readers perceive your content and whether they choose to click.
Title sentiment refers to the emotional tone of your blog post title, whether it feels positive, negative, or neutral.
Examples:
- Positive: 10 Brilliant Ways To Boost Your Blog’s Success.
- Negative: The 7 Fatal Blogging Mistakes You Are Probably Making.
- Neutral: A Guide To Writing Blog Post.
Use Numbers and Brackets
By adding numbers, years and brackets to your titles, they become easier to scan and more appealing, giving the readers a clear, quantifiable promise and additional details about the content.
If your goal is to discover how to write a blog post titles that capture attention quickly, using list formats is a proven strategy.
For instance:
- 8 Proven Strategies To Boost Your Mental Health [Scientifically Backed].
- 12 Must-Know Secrets For A Successful Fitness Journey In 2025.
Front-Load Your Keyword
Search engines give more weight to keywords near the beginning of your title.
If you keyword is “Time Management”.
Instead of using:
- How To Maximize Your Productivity With Time Management.
Try:
- Time Management: How To Boost Your Every Day Productivity.
AI Title Optimization Tools
To achieve best results, use AI tools to fine-tune your titles not just for human readers, but also for SEO effectiveness.
One of the best AI tools is Writesonic.
- The AI can generate dozens of SEO-optimized title variations using your primary keyword within seconds.
- It can also customize for tone, audience, and platform (blog, email, social, etc.).
CoSchedule Headline Analyzer Or MonsterInsights Plug-In
- The tools rate your blog post title on word balance, length, sentiment, and skimmability.
- Offer actionable feedback.
- Give you an Engagement Score and Impression Score, with tips on improving your title’s resonance with readers.
These are key factors that you should be familiar with when exploring how to write a blog post title that truly performs.
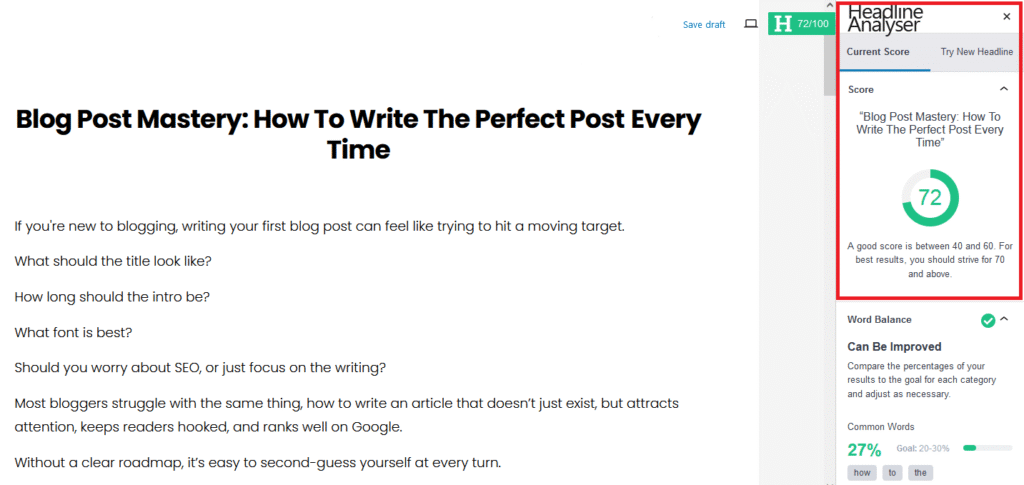
A good score is between 40 and 60.
However for best results, strive for 70 and above.
Now that you’ve nailed the perfect blog post title, it’s time to focus on what’s next.
Ready to start your blog?
Get up and running in minutes with a robust hosting provider like Bluehost for just $2.95/month.
2. How To Write A Blog Post Introduction
Your article’s introduction is your make-or-break moment.
If readers aren’t hooked in the first few lines, they may bounce.
Before writing anything, get clear on your introduction’s job.
It’s not just filler, it’s the strategic bridge between your title and your main content.
For beginners, it’s critical to understand that this short paragraph is your chance to connect, engage, and set the tone for the rest of the blog post.
It should clearly set expectations, briefly outline the benefit of the content, and subtly reassure the reader that they’ve landed in the right place.
An effective introduction begins with a hook, a sentence designed to grab attention.
The Hook
Your hook is the first 1–2 sentences of your blog post.
It’s what makes a visitor say:“Okay, I’ll keep reading.”
Learning how to write a blog post introduction that hooks the readers from the very first line is essential if you want them to stick around.
The hook can take many forms, a surprising statistic, a provocative question, a bold statement, or even a short personal story.
For example, you can open with a question like:
- “What if the secret to better focus, mood, and energy was just getting an extra hour of sleep?”
Or with data:
- “People who sleep fewer than 6 hours a night are 33% more likely to suffer from anxiety and burnout.”
Another option is to make a statement:
- “Fixing your sleep is the healthiest thing you can do this year.”
You can even tell a relatable story:
- “I thought I was stressed, until one week of good sleep made me feel like a new person.”
These types of openers work well because they create immediate curiosity and emotional connection.
After the hook, the next few sentences should offer context and preview of what the blog post will deliver.
Content
Once you’ve hooked the reader, the next element in how to write a blog post introduction is the content.
It gives them just enough background to understand why this post is relevant to them.
Here you need to address the reader’s pain point or challenge, explain why the topic is important, and begin to build trust.
This is where you briefly acknowledge:
- What the reader might be struggling with.
- Why the problem matters.
- The reason why your post is worth their time.
You’re answering an unspoken question of “Why should I care?”
For instance:
“Learning a new language sounds exciting until you’re buried in grammar rules, unfamiliar sounds, and vocabulary lists that never seem to stick.
If you’ve tried apps, books, or classes and still can’t hold a conversation, you’re not alone.
The truth is most people struggle because they’re using methods that don’t match how we naturally learn.
But with a smarter, more practical approach, becoming conversational in a new language is totally achievable, even if you’re starting from scratch.”
Preview
The final part of how to write a blog post introduction is the preview.
It’s where you summarize what the reader can expect from the rest of the blog post.
This isn’t a full outline, just a short line that reassures them you’ve got the answers.
A good preview:
- Highlights what the post will help the reader achieve or do.
- Reinforces the benefit of reading it.
- Uses positive, clear language.
Example:
“By the end of this guide, you’ll know how to build a realistic monthly budget, cut unnecessary spending, and start saving without feeling restricted.”
Proven Formula That Works Like A Charm
Here’s how a great introduction (hook + content + preview) looks in one short example:
Hook: “Ever followed a workout plan for weeks and still saw zero results?”
Context: “You’re not alone. Many people put in the effort but get stuck because their routine isn’t aligned with their goals or body type.”
Preview: “This guide will show you how to build a workout plan that actually works, it’s personalized, effective, and backed by science.”
This structure builds momentum, grabs attention, speaks to the reader’s struggle, and promises a solution.
Ideal Length
For those learning how to write a blog post, I recommend an introduction between 100-200 words.
Approximately 5-7 short paragraphs or 10-12 sentences.
Keep it concise.
Avoid long-winded explanations, and resist the urge to include too much information.
The introduction isn’t the place to teach your audience, it’s where you invite them to continue reading further.
If you haven’t already, get your blog online with Bluehost, so we can move on to the next section and create the body content of your blog post.
3. How To Write A Blog Post Body Content?
Once your title and introduction have convinced the reader to stick around, the body of your blog post needs to deliver on that promise.
This is where your content truly shines or falls flat.
Great body content isn’t just about presenting information, it’s about structuring it in a way that’s easy to follow, engaging to read, and optimized for both humans and search engines.
Start by paying attention to your paragraph structure.
Paragraph Structure

Each paragraph should focus on a single idea or point, making it easier for readers to digest the content.
Avoid overwhelming the readers with long walls of text, aim for paragraphs that are 2–4 sentences long.
It makes the page feel lighter and keeps my content airy and easy to scan.
When I was learning how to write a blog post, a technique I adopted was writing every sentence on a new line.
It improves readability as it allows the eye to move down the page with ease.
For example,
Too dense:
“Time management is essential for productivity and stress reduction, especially when you have multiple responsibilities to juggle. Many people struggle because they don’t plan their time effectively and often underestimate how long tasks will take.”
Easier to read:
“Time management is essential for productivity.
Many people struggle because they underestimate how long tasks will take.
With the right approach, you can reduce stress and get more done in less time.”
To further enhance readability, use active voice as much as possible.
It makes your writing clearer and more engaging, while passive constructions tend to feel distant.
Example:
- Passive: The task was completed by the team.
- Active: The team completed the task.
Mix short and longer sentences to maintain natural rhythm and prevent monotony.
Also, avoid starting 2 consecutive sentences with the same word as your blog post content becomes repetitive.
Start some sentences with transition words, others with strong subjects, and some with questions to keep the reader engaged.
Next, consider how you guide readers through your post.
Strong transitions and flow are another essential part of how to write a blog post, they guide the reader from one idea to the next without confusion.
Use transitional phrases such as “Next,” “In contrast,” or “For example” to connect ideas and sections smoothly.
Structure your post logically, group related information together, present steps in a clear sequence, and avoid sudden topic jumps.
If you’re writing a step-by-step guide, keep the order chronological.
However, if it’s analysis, structure it from big picture to detail or vice versa.
A coherent narrative makes your content more persuasive and enjoyable to read.
Clear and concise writing that avoids jargon will always outperform overly complex text.
Finally, don’t underestimate the power of subheadings.
Formatting Your Blog Post

No matter how well-written your content is poor formatting can discourage readers from engaging with it.
On the other hand, good formatting enhances your blog post readability, accessibility, and overall user experience.
Start with typography.
Your font choice should be clean, professional, and easy to read on all devices and browsers.
Use Sans-serif fonts like:
- Arial
- Helvetica
- Roboto
- Open Sans
These are excellent choices for body copy because they look sharp on screens and minimize eye strain.
Avoid fancy or overly decorative fonts, they can slow down reading and appear unprofessional.
If you want to figure out how to write a blog post that looks polished and performs well, your font selection plays a bigger role than you might think.
Font size matters just as much.
Use 14px font size for your text.
This range is large enough to be comfortable on desktop and mobile without requiring zooming or squinting.
For headings, use a clear hierarchy:
- H1 only for your blog post title.
- H2s for main sections.
- H3s for subsections.
Visually distinguish headings with increased size, bold weight, or spacing to help guide the reader through your content.
For instance:
H1 Heading – 30px
H2 Heading – 26px
H3 Heading – 22px
Keep subheadings short, clear, and benefit-driven.
From an SEO standpoint, include relevant keywords naturally in your H2 and H3 subheadings.
Avoid keyword stuffing, but make sure your blog post headings match what your audience is searching for.
Great subheadings serve your audience by making your content easier to navigate.
However they also serve the search engines by helping them understand the importance and hierarchy of your content sections.
If you want to master how to write a blog post that ranks well, optimizing your subheadings with relevant keywords is a must.
Use tools like Semrush or Frase to find keyword-rich subheadings that match search intent.
Also, pay attention to line spacing and font color.
Use 1.5 line height to avoid cramped lines, and add ample spacing between paragraphs.
Proper spacing improves legibility and gives your content room to breathe.
In addition, you want to use black colour text on white background, so the text pops and it’s easier to read.
For example:
Finally, use visual breaks.
Start your blog with Bluehost, a beginner-friendly hosting provider that makes your launch quick and easy.
4. Visual Elements That Make A Difference
Strong writing gets attention, but visual formatting keeps readers engaged.
In today’s online environment, attention is fragmented, people scan more than they read.
That’s why visual elements and smart formatting are crucial.
Visual elements help break up text, emphasize key points, and make your blog post more accessible and appealing.
Images

You can’t learn how to write a blog post without understanding the importance of images.
They’re not just decorative, they reinforce your message and increase reader retention.
A well-placed image after every 400–500 words can drastically boost engagement and reduce bounce rates.
Place images near the point they support.
For example, a screenshot should follow the step it illustrates.
Use infographics to summarize complex ideas and stock photos less frequently, only when they match the tone and topic of your post.
Images should be high-resolution, relevant, and optimized for fast loading.
Add alt text for accessibility and SEO.
Use tools like Canva to create high-quality, custom images, graphs and infographics.
The ideal image size for blog posts depends on where and how you plan to use the image (full-width banner vs. inline image).
Here are the ideal blog image sizes (in pixels):
1. Featured/Banner Image
- Recommended: 1200 x 628 px
2. Inline/Body Images
- Recommended: 600–800 px wide
These are large enough for clarity but not too big to slow down loading.
3. Thumbnails
- Recommended: 150 x 150 px or 300 x 300 px (square)
Used in blog feeds or related posts sections.
4. Blog Post Infographics
- Recommended Width: 800–1000 px
- Height: up to 2000 px
Infogrphics should be tall enough to include detail but not so long that they become hard to view on mobile.
It’s important to master how to write a blog post that is user-friendly across all devices.
Other Technical Tips
File formats to use:
- .JPEG for photos.
- .PNG for graphics/logos with transparency.
- .WEBP for optimized performance.
File size: aim to keep images under 150 KB for faster loading, unless it’s a complex graphic.
Resolution of 72 DPI is standard for web.
Avoid uploading print-resolution (300 DPI) images.
To compress your images, try tools like TinyPNG, it reduces file size without losing quality.
If you’re using graphs, data visualizations, or process diagrams, ensure they’re labelled clearly, so they enhance your content, and not distract from it.
How To Write A Blog Post Tables, Lists & Callouts?
Readers love structure, and few tools deliver that better than lists and tables.
Use bullet points to summarize tips or benefits, and numbered lists for steps or processes.
These break up your blog post information into smaller chunks and make your content more actionable.
Use tables to compare features, show structured data, or group information logically.
Make sure your tables are mobile-friendly by keeping them narrow or collapsible.
Callout boxes like tip boxes or quote highlights are great for emphasizing takeaways, pro tips, or key messages.
These help readers spot the most important information even if they’re just skimming.
In addition, make sure that all your blog posts have table of contents or short cut links that take the readers to each section of the article.
You also want to add “Back To Top” buttom.
These will help your readers to nativate your content easier.
So far, we’ve covered how to write a blog post title, introduction, craft body content and what visual elements to include.
Now it’s time to make sure that people can actually find your article.
This is where SEO optimization comes in.
If you haven’t started your blog yet, the easiest way to begin is by setting up your site with Bluehost a beginner-friendly hosting provider trusted by millions.
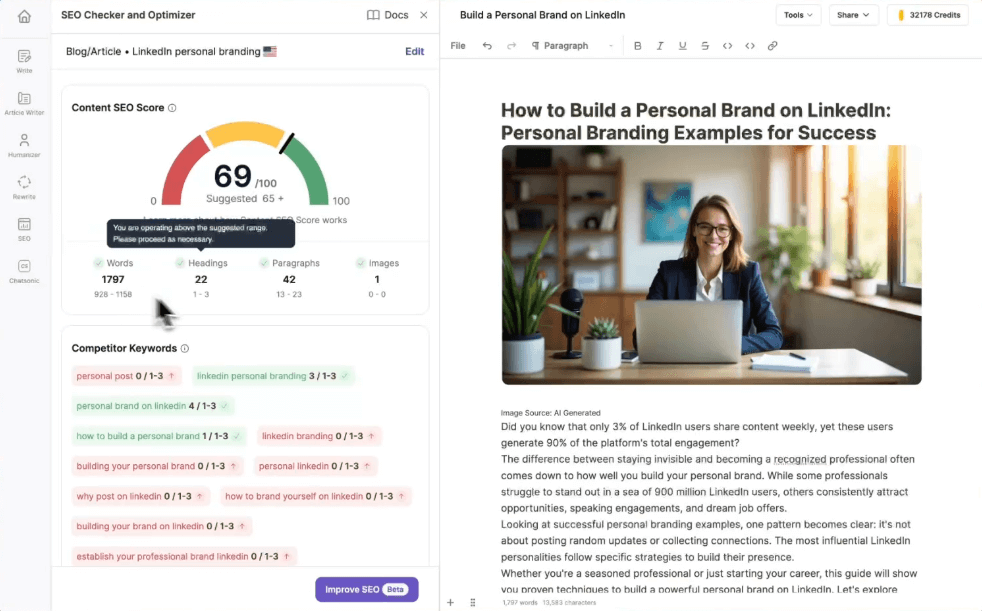
5. SEO Optimization
SEO or Search Engine Optimization helps your content to appear in search results, drive organic traffic, and ultimately reach the audience who is looking for and needs your content the most.
Effective SEO involves more than just adding keywords in your text.
It’s a comprehensive strategy that improves both your blog post visibility in search results and user experience.
For ease, we can break SEO down into four key elements: on-page SEO, keyword placement, internal/external linking, and schema markup.
On-Page SEO
Think of on-page SEO as the metadata and structural details that tell search engines and readers what your post is about.
In this how to write a blog post tutorial, we cover the three main elements that matter here:
1. Meta Title
This is the clickable headline that appears in search engine results.
It should include your target keyword, stay within 50–60 characters, and entice users to click.
A well-crafted meta title often mirrors your blog headline, but can be slightly refined for clarity or brevity.
2. Meta Description
This 150–160 character snippet gives users a preview of your blog post.
It should summarize your content clearly and include your primary keyword.
A compelling meta description can significantly improve your click-through rate (CTR).
3. URL Slug
Your URL should be short, readable, and keyword-rich.
Avoid unnecessary words like “and,” “the,” or long auto-generated strings.
For example:
- Best practice: mywebsite.com/time-management-tips
- Avoid: mywebsite.com/7-best-time-management-tips-for-working-parents-in-2025
Clean, keyword-aligned slugs help both search engines and users understand what your blog post content is about at a glance.
Keyword Placement
Each of your posts should focus on one keyword, a specific term or phrase, your target audience is actively searching for.
This focused approach helps search engines understand what your content is about and improves your chances of ranking for that keyword.
If your keyword is something like “How To Write A Blog Post”, you’d want to place it strategically throughout your content.
Noticed how I said strategically?
Here you can see how it looks in practice, using my best website builders post as an example.
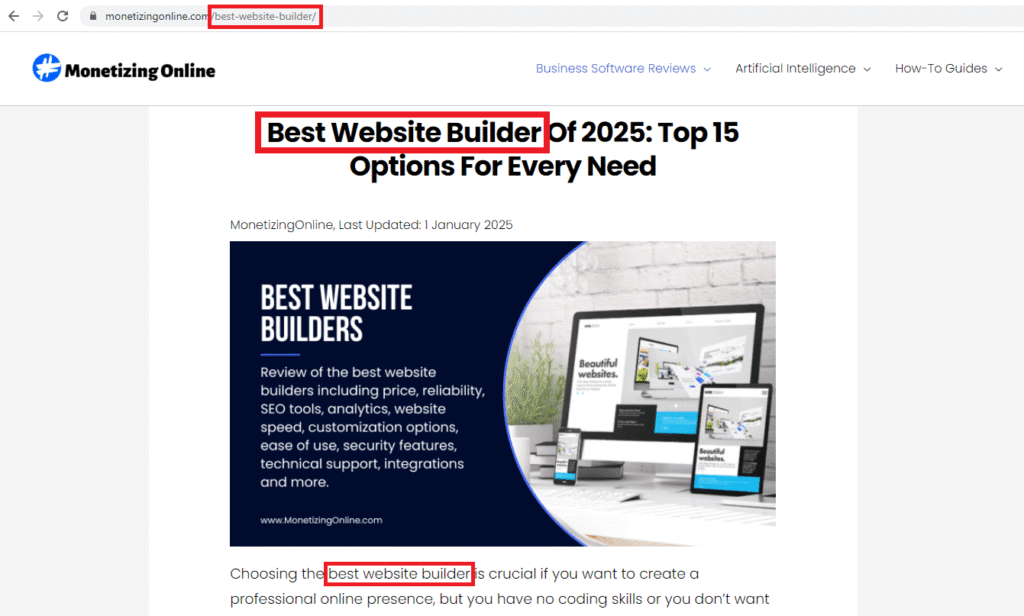
Title
Search engines like Google tend to place more weight on the first few words of your title.
This makes front-loading your keyword a smart SEO move, when you’re trying to rank for competitive terms.
But don’t scarify clarity or readability.
Introduction:
Include your primary keyword naturally within the first sentence.
This signals relevance to both search engines and readers.
Headings (H2/H3)
Use keywords in some (not all) of your subheadings.
This reinforces topical authority and helps readers scan content easily.
Body Text
Integrate your keyword organically within every 150–200 words, ideally where it supports the reader’s experience or reinforces the main idea of the section.
Keyword density is important, but overusing your keyword unnaturally can hurt your SEO.
Google penalizes content that appears manipulative or provides poor user experience.
Always prioritize clarity, flow, and value to the reader.
This is one of the most important things to take away from my how to write a blog post guide.
Image Alt Text
Every image should have an alt attribute describing what it shows, ideally including a keyword if relevant.
Alt text improves SEO and accessibility for screen readers.
Internal & External Linking
Links are like bridges in your content, they connect your ideas to a broader ecosystem of information and help Google understand your site structure.
Internal Links
They link to other relevant blog posts or pages on your website.
This improves SEO by spreading link equity and guiding users deeper into your content.
For example, link a productivity article to related tools or case studies on your site.
External Links
They link to external authoritative sources such as studies, government sites, or industry leading blogs.
This builds trust and adds context.
Make sure to:
- Open external links in a new tab.
- Link to trusted, high-quality sources only with domain authority (DA) of 50+.
- In your blog post use descriptive anchor text, instead of “click here,” use specific phrases like “see my guide to weekly planning.”
Schema Markup & Readability
For advanced SEO optimization, schema markup helps search engines understand your content’s structure and purpose.
Schema markup is often an overlooked part of how to write a blog post, as it doesn’t directly contribute to SEO.
However, using it can increase your chances of earning rich results like FAQs or how-to steps in the SERPs.
This improves visibility and drives more clicks from search engines.
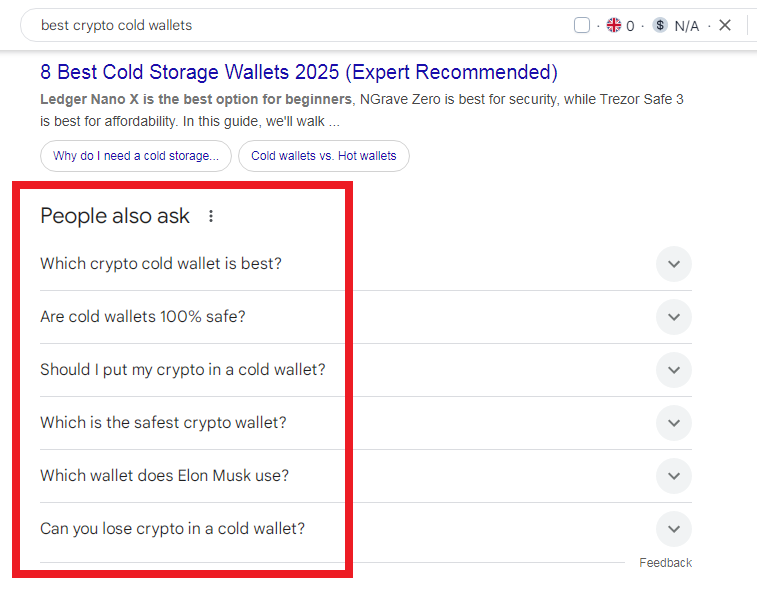
FAQ Schema
Use it if your post includes frequently asked questions.
It makes your content eligible for an expandable dropdown in Google results.
For instance, if you search for “best crypto cold wallets” you can see the FAQ schema shown below.
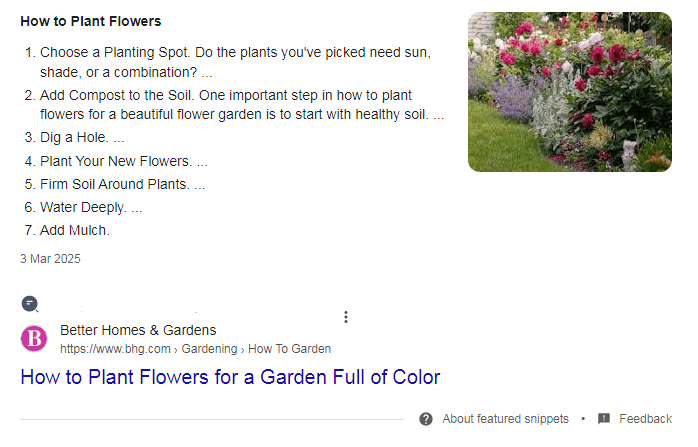
How-To Schema
It’s perfect for step-by-step guides.
The how-to schema shows a visual format in search results, often with images and bullet points.
To implement schema easily, use a SEO plug-in like Yoast.
It’s a user-friendly WordPress plug-in that helps you manage meta tags, schema, readability, and more.
The plug-in also includes readability scoring, which analyzes factors like sentence length, passive voice, transition word usage, and subheading distribution.
A high readability score helps with SEO, but it also ensures that users stay engaged and finish reading your blog post.
Now, let’s look at a how to use Yoast in practice to achieve best results.
How To Write A Blog Post Using The Yoast Plug-In?
When learning how to write a blog post effectively, tools like Yoast can guide you in optimizing both content and readability.
To illustrate this, I’ll use my best web hosting services post as an example.
Straightaway, you can see that the plug-in has 2 separate tabs for SEO and readability analysis.
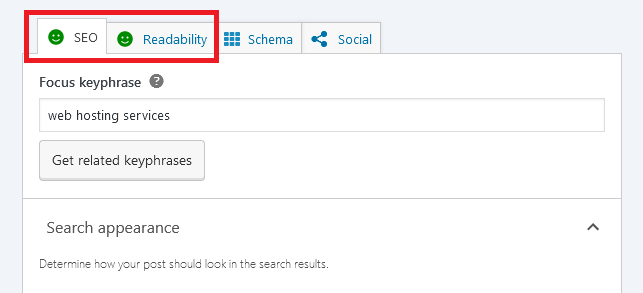
Let’s cover the SEO analysis tab first.
In the example below we have 13 good results, 1 that needs improvement and 1 problem that we need to address.
Before you start writing all green traffic lights will be red.
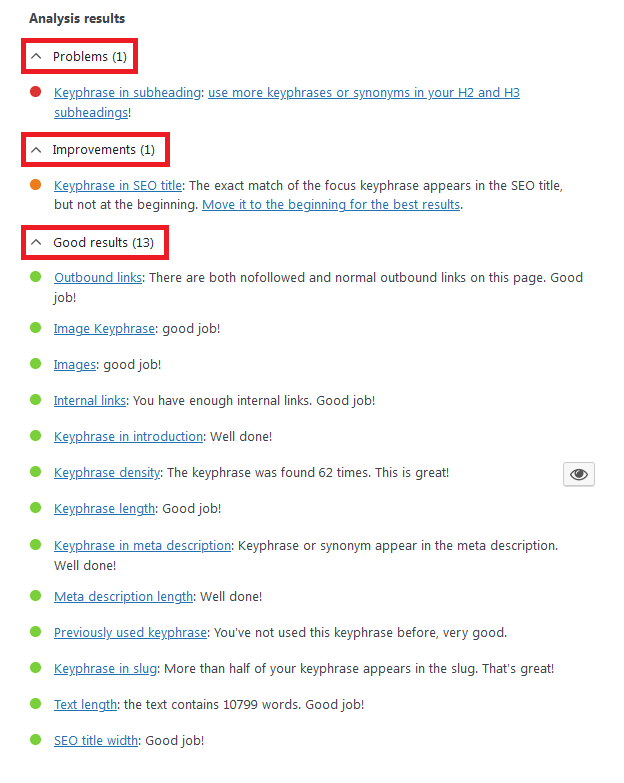
Your goal is to achieve as many green SEO entries as possible, while making sure that you content flows naturally.
Here is how to do this:
- SEO title width: create your SEO title using the steps we covered in the previous sections.
- Text length: your post should be between 2,500 and 10,000+ words depending on the type of article.
- Keyphrase in slug: make sure that your exact keyword appears in your slug.
- Previously used keyphrase: when you add your keyphrase, Yoast will automatically identity if you’ve used it before.
Pro Tip For How To Write A Blog Post:
To prevent cannibalization, when you’re writing your blog posts avoid using the same keyword or keyphrase in more than one article.
- Meta description length: optimal meta description length is 156 characters, stick to it, so Google doesn’t cut it off.
- Keyword in meta description: ensure that your exact keyword appears in your meta description.
- Keyphrase length: ideally your keyphrase should not include more that 4 content words (excluding “the”, “that”, “and”, etc.)
- Keyword density: integrate your keyword within every 150 to 200 words, where it makes sense but don’t over-optimise.
- Keyphrase in introduction: include your keyword in the first sentence of your introduction, if possible place it in the beginning of the sentence.
- Internal links: where appropriate add links on your post to other articles, guides or blog posts on your website.
- Images: add images to your article to make it more appealing, add one picture after every 400-500 words, however make sure that the images support your article’s content.
- Image keyphrase: where relevant include your keyphrase in some (not all) of your images’ titles, alt texts and descriptions.
- Outbound links: add outbound links to high-quality, external articles, websites or blogs which support your blog post thesis or point of view.
- Keyphrase in SEO title: create your SEO title and front-load your keyword for maximum impact.
- Keyword in subheading: integrate your keyword in your H2 and H3 subheading where relevant, the number of time you need to include it will depend on the length of your article.
Moreover, when you’re learning how to write a blog post that performs well in searches, use the Yoast plug-in as guidance instead of a rigid framework.
Now, let’s move on to the readability tab.
It includes several checks that guide you when writing blog articles.
The plug-in uses an algorithm to determine if your text is easy to read and understand.
This is a huge part of SEO, since Google places a significant emphasize on how well your content is written and the value it delivers to readers.
Below you can see that we have 5 good results and 1 problem to fix.
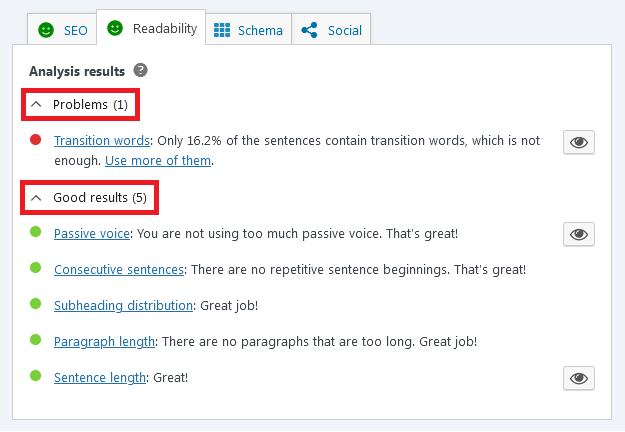
Your aim is to turn all traffic lights green.
To do that, consider the following elements:
- Sentence length: use mixture of short and longer sentences, but never exceed 20 words in a single sentence.
- Paragraph length: none of your paragraphs should contain more than 150 words.
- Subheading distribution: place relevant subheadings after every 280-290 words, which will break the text into a smaller, easier to read and digest parts.
- Consecutive sentences: don’t start two sentences with the same word, this will help you avoid repetitiveness and it’ll also make your content flow better.
- Passive voice: use more active voice as it makes your content more engaging and clearer.
- Transition words: guide the readers through your ideas by showing relationships between sentences and paragraphs, whether you’re comparing, contrasting, giving examples, or moving to a new point.
Understanding transition words is an essential element of how to write a blog post that flows naturally and keeps the reader engaged.
Common types of transition words include:
1. Addition – to expand on a point.
Also, in addition, furthermore, moreover, besides
Example: In addition to saving time, automation can also improve accuracy.
2. Contrast – to highlight differences.
However, on the other hand, nevertheless, even though, despite
Example: SEO takes time to show results. However, it offers long-term benefits.
3. Cause and Effect – to show consequences or reasons.
Because, since, as a result, therefore, thus
Example: The site was down for hours; therefore, sales dropped.
4. Examples – to illustrate a point.
For example, for instance, such as, namely, in particular
Example: Many tools help with productivity, such as Notion, Trello, and Todoist.
5. Comparison – to show similarities.
Likewise, similarly, in the same way, just as
Example: Just as blogging builds authority, podcasting can do the same.
6. Conclusion or Summary – to wrap up or restate.
In conclusion, to summarize, overall, finally, in short.
Example:
“To summarize, consistency and clarity are key to great content.”
Furthermore, Yoast offers other features to help you with how to write a blog post effectively, such as the Yoast eye icon.
It helps you determine if your content needs any adjustments.
Yoast Eye Icon
The eye icon in the Yoast SEO plug-in is a highlighting tool that helps you visually identify where issues appear in your text.
When you click the eye icon next to a specific item (like passive voice, long sentences, or consecutive sentences):
- Yoast highlights the problem areas directly in your blog post editor.
- Each issue is colour-coded based on the type of readability concern.
- This helps you locate and fix issues faster without hunting through your text manually.
Example:
Let’s say Yoast flags that too many consecutive sentences starting with the same word.
Click the eye icon next to that message.
In your post editor, Yoast will highlight those sentences so you can revise them.

Pro Tip: This tool works best in WordPress’s block editor (Gutenberg) or the classic editor.
Once your article is fully optimized for search engines, the next critical element in this how to write blog post guide is converting readers into subscribers, leads, or customers.
Ready to launch your blog?
Start today with Bluehost for just $2.95/month.
6. Call-To-Action That Converts
After all, what’s the point of drawing in organic traffic to your blog posts if visitors leave without taking the next step?
This is where a strategically crafted and positioned call-to-action (CTA) makes all the difference.
CTA Types

A CTA is more than just a button or a text link, it’s a prompt that guides the reader toward a specific action you want them to take.
Depending on your goal, your CTA could encourage readers to subscribe to your newsletter, start a free trial, download a lead magnet, register for a webinar, or make a purchase.
Whether you’re nurturing leads or driving sales, choosing the right CTA type is essential.
For example, a blog article offering in-depth advice might end with a CTA to download a free checklist, while a product review could include a “Buy Now” or “Start Free Trial” button.
CTA Placement
Where you place your CTA is just as important as what it says.
To understand how to write a blog post that converts you need to know where to position the CTAs for maximum impact.
- One near the top (for impatient readers), it works well for limited-time offers or lead magnets.
- Another in the middle (to re-engage scanners) or give a gentle nudge for those already engaged.
- And one at the bottom (once you’ve built full trust), it typically performs best when your reader has consumed your content and is ready to take the next step.
If you have to, use a heatmap or scroll tracking tool to test and refine CTA placement for higher conversions.
CTA Design & Copy
The design and wording of your CTA can make or break its effectiveness.
The button colour should contrast with your blog’s theme to stand out, but still look natural in your design.
I would recommend using brighter colors like yellow, red or orange to draw the reader’s attention.
A good example is Amazon, the biggest online retailer, they use orange CTAs:

Use clear, action-driven text like “Download the Guide,” “Start My Free Trial,” or “Get the Checklist.”
Avoid vague labels like “Submit” or “Click Here.”
The button size should be large enough and easily clickable on both desktop and mobile devices.
If you’re using text-based CTAs (such as hyperlinked phrases), ensure the font colour and underline make them clearly visible and distinguishable from regular blog post text.
In short, a high-converting CTA combines purpose, placement, and visuals.
It guides your reader through the journey you designed from discovery to decision.
After we’ve covered the technical aspects of how to write a blog post, from crafting a compelling title to structuring your introduction and body content, it’s time to apply what we’ve learned during the research and planning phase.
If you’re ready to launch your blog, Bluehost is the perfect place to get started with powerful tools and great support.
7. Research & Planning
Creating great written content involves research and planning.
During this stage you want to make sure that you’re covering the right topic, targeting the correct audience, and creating something better than what’s already out there.
Research and planning aren’t optional, they’re the secret ingredients that separate mediocre blog posts from top-ranking, high-converting ones.
If you want your article to stand out, rank well, and resonate with your audience, you need to validate your topic, study your competitors, and craft a clear, strategic outline.
Here’s how to do it step-by-step.
Topic Validation
Before you start writing, you need to ensure that your chosen topic has both demand and opportunity.
Topic validation is the process of confirming that a subject is worth your time and effort because people are searching for it, and your blog post stands a reasonable chance of ranking in the search results.
1. Use Keyword Research Tools To Measure Demand
This is a crucial step in how to write a blog post that ranks well.
Start by using keyword research tools like Semrush to help you understand the search data and filter through metrics like:
- Search volume
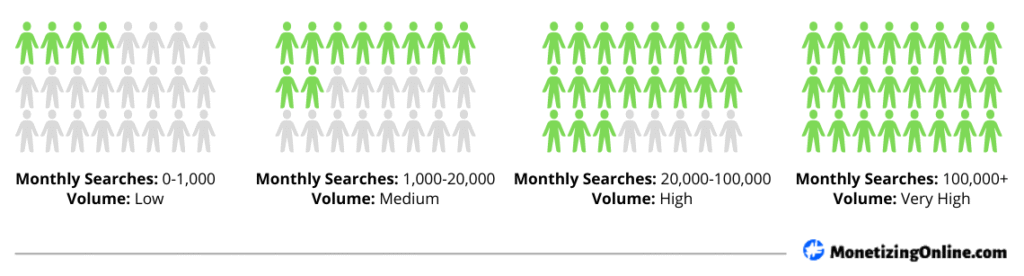
This tells you how many people are searching for a keyword per month.
Search volume can be Low, Medium, High and Very High.
For example,
“Time Management Tips” has 22,000+ monthly searches.
Compare that to something more niche like:
“How To Organize Your Calendar”, which has approximately 600 monthly searches.
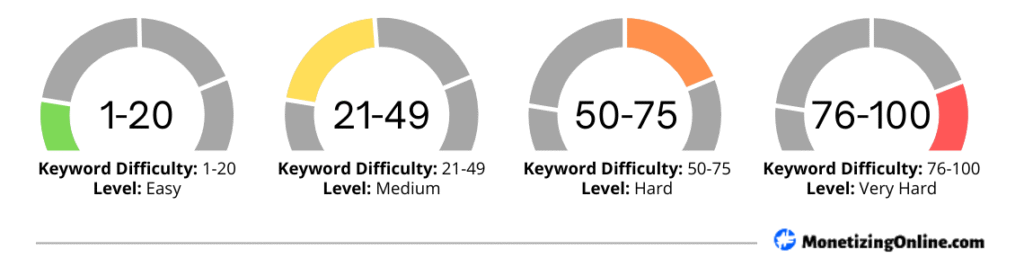
- Keyword Difficulty (KD)
It estimates how easy it’ll be to rank for a keyword on the first page of Google during organic searches.
KD measures the competition on the scale of 1 to 100.
The scale can be divided into 4 levels: Easy, Medium, Hard and Very Hard.
For example:
“Productivity Hacks” has a KD of 70/100 (very competitive).
“Morning Routine For Students” has a KD of 28/100 (much easier to rank for).
- Cost-Per-Click (CPC)
CPC represents the amount of money spent for each click in a paid marketing campaign.
This is an important metric because the higher the CPC, the more commercially valuable the word is.
- Search Intent
User search intent is the reason why someone is searching for a specific topic online.
It’s an important consideration when learning how to write a blog post that truly meets your readers’ needs.
Ask yourself:
“What do users want when they perform a search?”
Is their search intent informational?
This is when a user is only looking for information on a specific subject.
For example:
Searching for “What is a CRM system” suggests an informational intent.
In this case, the user wants to understand what a customer relationship management (CRM) system is.
On the other hand, the user search intent can be transactional?
For instance:
Someone searching for “Best CRM tools” implies commercial investigation.
The person is familiar with the product or service and they’re looking for the best option, so they can make a purchase.
Informational articles include words like “How-to”, “Best-way-to” “What” or “Why”, a good example is “How to Make Money Online”.
Whereas, transactional posts typically contain intent-specific word like “Best” or “Buy” + keyword, for example “Best Video Conferencing Software”.
You want to publish 80% transactional and 20% informational posts.
Focus on these 2 types of search intent as they’ll drive the most traffic and revenue for your blog.
Pro tip: Aim for keywords with medium-to-high search volume and low-to-moderate difficulty, especially if your blog is new or still building domain authority.
Analyze Competitor Content

Once you have a keyword idea, plug it into Google and analyze the top-ranking pages.
You want to find out what content already published, which will help you how to write a blog post that is better.
Look for:
Content Gaps
- Are the top ranking posts outdated?
- Maybe they’re missing examples?
- Are they skimming over important subtopics?
Word Count:
Is Google rewarding long-form content?
If the top posts average 2,000+ words, yours shouldn’t be writing 800 words article unless it’s highly visual or laser-focused.
The easiest way to check the word count is to copy the blog post and past it into a Word document.
To increases your chance of ranking in the first pages of Google, make sure that you write a longer and more in-depth articles that what is already out there.
Authority Level
Are you competing with massive domains like HubSpot or Forbes?
If so, consider targeting a long-tail variation of your keyword: “Time Management Tips For Freelancers” instead of the broad “Time Management Tips”.
Example:
If you search “How To Build A Personal Brand,” you’ll likely find huge sites ranking for this keyfrase.

But “Personal Branding For Introverts” with approximately 1050 searches a month is more specific, less competitive, and offers a unique angle.
Use Google Trends To Validate Seasonality & Interest
Google Trends is a free, powerful tool for checking how a topic is trending over time.
Before diving into how to write a blog post, confirm whether your topic is gaining traction, staying steady, or losing relevance.
Here’s how to do it:
1. Visit Google Trends.
2. Type in your topic or keyword.
3. Adjust the time frame to view interest over the past 12 months or 5 years.

You’re looking for:
- Consistent interest: a flat, stable line means the topic has year-round demand.
- Spikes: seasonal topics like “Christmas Gift Ideas” will peak in November or December.
- Growth: emerging trends, such as “AI Productivity Tools,” might show a steep upward climb, these are great opportunities to ride the wave of rising curiosity.
Stay away from topics on a declining trend because less people are searching for them over time.
Putting It All Together
When validating your topic, you’re balancing volume, competition, CPC and search intent.
Let’s say you find the keyword “Best Snowboard Brands”.
Using a keyword research tool, you can see that the term has the following parameters:
- Keyword: best snowboard brands
- Monthly search volume: 6,600
- Keyword difficulty: 17
- Cost-per-click: $11.79
- Search Intent: spikes

Keyword difficulty is low at 17, suggesting that your post could rank for this term relatively easy.
Because we know that a post ranking number 1 on Google gets 33% of the organic traffic on average, we can calculate that a #1 position will bring in 2,178 (6,600 x 33%) monthly organic visitors.
On top of that, mastering how to write a blog post will help you rank for hundreds of variations of the main keyword, such as: winter sports equipment, snowboarding gear and equipment for snowboarding, pulling additional 2,000-3,000 monthly page visits.
The CPC is also high, meaning that the keyword has commercial value.
It contains the word “best”, indicating strong search intent that you can match with a list-type, transactional post.
For example:
“11 Best Snowboard Brands For Beginners”
The search trend spikes massively over long periods of time, which means that the keyword should continue to generate traffic for years to come.
Therefore, these are all strong signals to move forward with writing.
However, when you’re looking for relevant keywords to target, it’s important to search for more specific terms.
Instead of “Workout” search for “High-Intensity Interval Training” or “Crossfit Exercises For Working Professionals”.
Instead of “Shoes”, try searching for “Running Shoes”.
Make sure to check the keyword suggestions for other variations of the term that you can either target or include in your content, headings and subheadings.
To find medium-to-high volume, low competition keywords in any niche, head over to Semrush and using the filter set the keyword search volume to a minimum of 1,000 and the keyword difficulty to a maximum of 20.
Around 90% of your posts need to cover these keywords, since they will generate the most revenue for your blog.
If a keyword is highly competitive or the SERP is dominated by major brands, consider narrowing your focus with a long-tail keyword or changing the angle.
Validated topics set the foundation for high-performing posts.
Skipping this step when learning how to write a blog post creates the risk of writing content no one is searching for or that never outranks the competitors.
Start your blogging journey on the right foot by launching your site with Bluehost.
8. Writing Tools & Software To Use
Once your research is complete and your outline is ready, the next step is bringing your blog post to life.
Choosing the right tools that streamline the writing process, boost your productivity, and improve the quality of your work is crucial.
From platforms that draft your content to software that checks grammar for you, here’s a breakdown of the most effective writing tools that you can use:
1. AI-Assisted Writing Tools
AI content writing tools are powerful co-writers.
They help you brainstorm ideas, overcome writer’s block, generate drafts, and even optimize for SEO.
Tools like Writesonic, offers SEO-optimized blog writing capabilities with AI-generated content that fits various tones and formats.
It can generate an SEO-optimized blog post within seconds with just a keyword and tone selection.
The next step, when exploring how to write a blog post is checking the content for clarity, grammar and style.
Platforms like Grammarly can catch spelling mistakes, grammar, passive voice, and even awkward phrasing.
It’s ideal for article writing and integrates with Google Docs, WordPress, and browser extensions.
You can also try ProWritingAid.
The tool combines grammar checking with in-depth style and structure suggestions.
It’s a robust AI-writing solution for long-form content and reports on pacing, sentence variety, and readability.
ProWritingAid is best for bloggers looking to improve their overall writing quality, not just grammar.
2. Google Docs
Google Docs is a favourite for many bloggers due to its ease of use, real-time collaboration, and autosave feature.
It’s an excellent tool if you’re collaborating on a post.
You can use Google Docs to leave comments on structure, suggest rephrasing, or update links without the need to download or send email attachments.
3. WordPress Editor (Gutenberg)
If you’re using WordPress to publish your blog, using the Gutenberg editor gives you a WYSIWYG (What You See Is What You Get) experience.
It allows you to format headers, embed media, add links, and structure your content block-by-block.
The editor is excellent for direct publishing, and previewing how content will appear on your site.
You can write and format a post using H2s and bullet points in WordPress, then instantly preview how it looks on desktop and mobile.
Learning how to write a blog post with the correct AI-writing tools will help you cut creation time in half, produce stronger content, and keep a steady flow of blog posts without burning out.
Now that you’ve created your first draft using AI, it’s time to shift gears and focus on perfecting your blog post.
Bluehost makes launching your blog effortless, get started today and share your voice with the world.
9. Blog Post Editing & Proofreading Stage
Once your draft is complete, resist the urge to hit publish immediately.
The real magic happens during the editing and proofreading stage.
It’s where you refine your message, and ensure your post is clear, professional, and well structured.
Whether you’re writing yourself or using AI content writing tools, a well-defined editing workflow saves time and boosts quality.
Editing Workflow: From AI Draft To Final Blog Post
A solid editing process often works best in three distinct stages:
1. AI-Generated First Draft

Starting with a blank page is one of the biggest hurdles before you truly grasp how to write a blog post.
That’s where AI writing tools come in.
Platforms like Writesonic can help you move from idea to first draft faster than ever.
Rather than replacing the writer, AI serves as a productivity partner, helping you overcome creative blocks, expand outlines, or rephrase awkward wording.
Why Start with AI?
Using AI for your first draft offers several benefits:
- Speed: generates 1,000–5,000 words in seconds.
- Structure: follows your outline and fill in logical content.
- Inspiration: suggest hooks, transitions, and examples you may not have considered.
- Consistency: maintains tone or brand voice using AI presets.
For example, if your topic is “How to Improve Sleep Hygiene,” you can prompt the AI tool like:
“Write an introduction for a blog post about sleep hygiene targeted at busy professionals.”
The tool might return:
“In today’s fast-paced world, sleep is often the first thing we sacrifice. Yet, quality sleep is one of the most important pillars of physical and mental health. This post explores simple, science-backed ways busy professionals can improve their sleep hygiene without overhauling their lifestyle.”
With a small edit, you have a usable intro that can kick-start your momentum, when learning how to write a blog post articles consistently.
Best Practices For AI-Assisted Drafting
Provide a Clear Prompt:
- The more context you give, the better the output.
- Include tone, target audience, and structure requirements.
Example:
“Write a conversational paragraph for a blog post that explains how hydration affects energy levels. The target audience is fitness beginners.”
Use an Outline as Input:
- AI works best when fed structure.
- Give it your H2s/H3s, and let it expand them paragraph by paragraph.
Fact-Check Everything:
- AI can sound confident while being inaccurate.
- Always verify statistics, medical claims, or product features.
Edit Immediately:
- Don’t treat the AI draft as publish-ready.
- Edit for accuracy, tone, and flow as soon as the content is generated.
Avoid Over-Reliance:
- Rotate between AI assistance and your own writing to keep content original and engaging.
Starting your first draft with AI is about removing friction.
By using AI to generate your draft, you conserve energy and creativity for what really matters: editing, refining, and shaping a post that truly connects with your audience.
2. AI-Assisted Edit
Once you’ve shaped the draft, bring in tools like Grammarly to check grammar, spelling, readability issues, and repetitive language.
It’s using AI to check the AI.
These tools are especially effective at tightening sentences and improving flow, an essential step if you want to master how to write a blog post.
3. Final Human Edit

Step away from your draft for a few hours before reviewing it with fresh eyes.
It’ll help you spot inconsistencies, clarity issues, or formatting problems you missed.
Focus on structure, clarity, and flow.
Are the ideas logically organized?
Are the paragraphs tight and purposeful?
Common Mistakes to Eliminate
Even the best writers fall into common traps.
Be on the lookout for:
- Wordiness: Trim unnecessary modifiers, fluff and filler phrases.
Example:
“Due to the fact that” → “Because”
- Repetition: Avoid overusing phrases or restating the same idea.
Example:
Instead of repeating “very effective,” vary with “impactful,” “efficient,” or “powerful.”
- Unclear Phrasing: Use direct, concrete language.
Weak: “There are some tools that may help.”
Stronger: “Tools like Grammarly can significantly improve your writing clarity.”
- Passive Voice: Prefer active voice to keep sentences strong and direct.
Passive: “The blog post was written by the team.”
Active: “The team wrote the blog post.”
- Tone Mismatch: Make sure the tone suits your brand and audience, whether casual, authoritative, or technical.
Mobile Preview
With over 60% of web traffic coming from mobile devices, mobile readability is non-negotiable when studying how to write a blog post.
Before publishing:
- Preview your blog post on different screen sizes.
- Check font size (should be 14px or larger).
- Ensure line spacing is comfortable.
- Verify images and CTAs scale properly.
Most CMS platforms like WordPress have built-in mobile preview tools.
The time you invest in editing and proofreading your blog posts before publishing will reward you in the long run with higher engagement, better SEO performance, and more return visitors.
Now that your post is polished and error-free, it’s time to wrap things up with a conclusion that leaves a lasting impression.
Start your blog with Bluehost and get reliable hosting, a free domain, and everything you need to launch fast.
10. How To Write A Blog Post Conclusion?
A strong blog post conclusion should do more than just end the article, it should reinforce your message, motivate action, and leave a lasting impression.
Here’s what a blog post conclusion should include:
1. Concise Recap

Summarize the key points covered in the post, but don’t repeat everything word for word.
Instead, highlight the major takeaways in a concise way.
This helps reinforce learning and ensures readers leave with the main message clear in mind.
Example:
“To recap, we explored how to write a blog post, structure it, optimize for SEO, and use AI tools effectively to streamline your writing process.”
2. Final Tips Or Insights
Offer 1–2 final pieces of advice that wrap up your topic neatly.
This adds value and gives your readers something extra to consider, even if they skimmed through the article.
Example:
“Remember, consistency beats perfection. Building a sustainable writing habit will take you further than chasing viral content.”
3. Encouragement To Take Action
Encourage readers to apply what they’ve learned.
This could be a gentle nudge to start writing, try a tool, or implement a new strategy.
The call-to-action doesn’t have to be aggressive, it just needs to point the reader toward the next step.
Example:
“Try using one tip from this guide in your next post, just one, and see the difference it makes.”
4. Engagement Prompt (Optional)
Ask a question, invite comments, or encourage sharing.
This helps boost engagement and can improve SEO through user interaction.
Example:
“What’s your biggest challenge when writing blog content? Drop a comment below, I’d love to hear your thoughts.”
5. Call-To-Action (CTA)
If appropriate, guide the reader to a next step: sign up for your newsletter, read another post, download a resource, or try a product.
Example:
“Ready to level up your content strategy? Download our free content calendar template to get started.”
With your conclusion written and your message wrapped up, the only thing left to cover in this how to write a blog post guide is how to publish your article and track its performance.
If you haven’t already, start your blog the right way with Bluehost.
11. Blog Post Publishing & Performance Tracking
Hitting “publish” isn’t the end of your blog post’s journey, it’s the beginning of its performance lifecycle.
If you’re using WordPress all you need to do is click “Publish” in the WordPress editor and your blog post will be live within seconds.
Once your post is live, tracking how it performs is crucial to ensuring your hard work pays off.
Analytics tools and performance metrics help you identify what’s working, what needs tweaking, and when it’s time to refresh older posts for SEO gains.
Ensuring Your Blog Post Is Indexed
Before your blog post can rank or drive any organic traffic, it needs to be indexed by search engines like Google.
Indexing means that Google has crawled your page and added it to its searchable database.
If your post isn’t indexed, it’s invisible on Google, no matter how good the content is.
How To Index Your Blog Post?
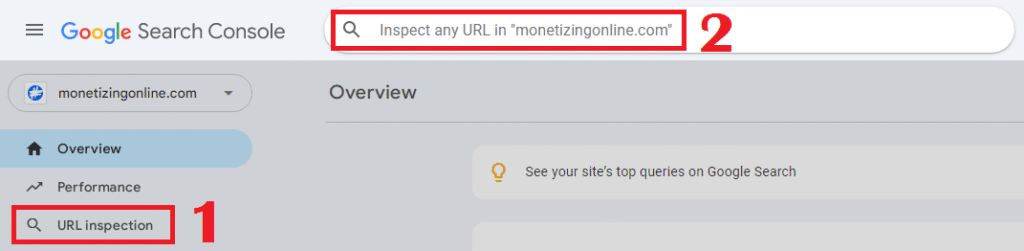
1. Submit the URL in Google Search Console.
2. Go to URL Inspection in Search Console.
3. Paste your blog post URL and click “Request Indexing.”
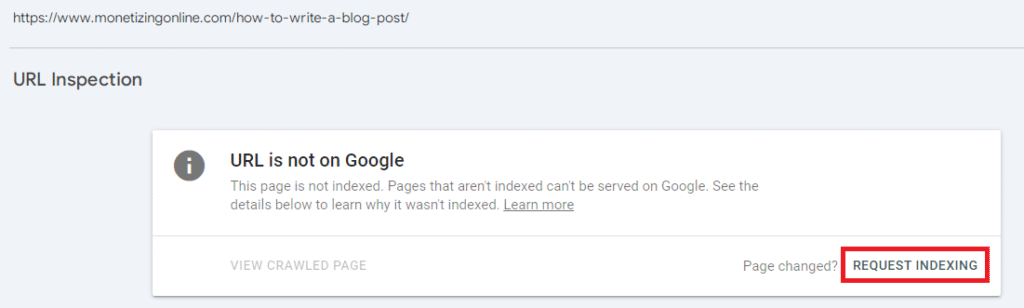
This prompts Google to crawl the page.
Internal Linking
Many new bloggers overlook the importance of internal links when learning how to write a blog post.
You want to link to your new post from older, already-indexed pages.
Google crawlers follow internal links, making it easier to discover new content.
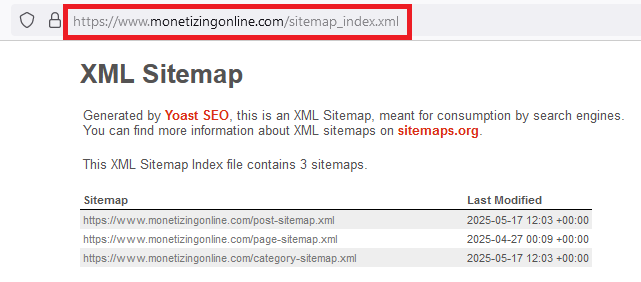
XML Sitemap
The XML sitemap is a file that lists all the important pages of your website in a structured XML format, making it easier for search engines like Google to discover and index your content.
Why it matters:
- It helps search engines crawl your site more efficiently.
- It highlights key URLs, especially new, updated, or hard-to-find pages.
- It can include metadata like the last modified date, update frequency, and importance of each page.
Make sure any new blog post is included in your site’s XML sitemap.
If you’re using WordPress with Yoast or Rank Math, this is done automatically.
To access your XML sitemap from your WordPress dashboard:
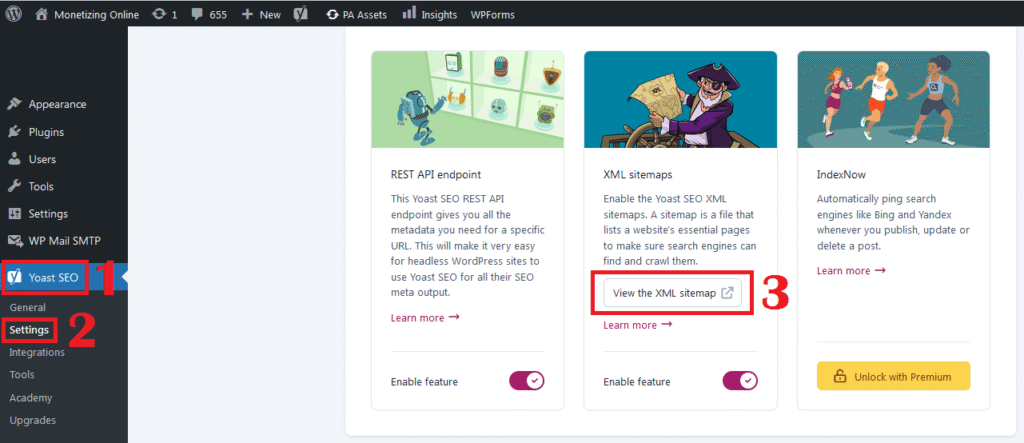
1. Go to Yoast SEO.
2. Click on Settings.
3. View the XML sitemap.
Once you access your XML sitemap, highlight and copy it.
Finally, submit your sitemap to Google Search Console.
1. Click on Settings.
2. Enter the sitemap link that you just copied.
3. Click Submit.
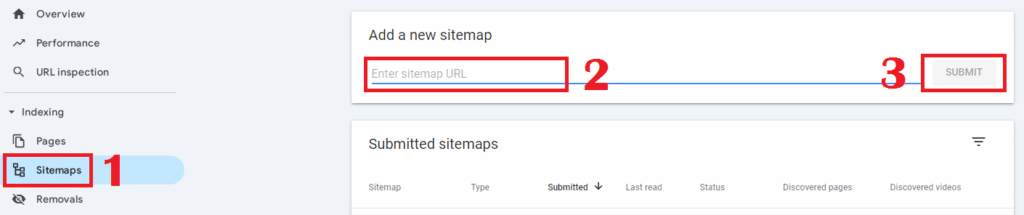
Submitting your XML sitemap to Google Search Console is one of the simplest and most effective steps in improving your blog’s SEO.
Avoid Indexing Errors
In Google Search Console, check for crawl errors or “noindex” tags accidentally added by plug-ins.
Ensure that your robots.txt file isn’t blocking the page or folder.
Use Social Signals
Share your post on platforms like Pinterest, LinkedIn, Twitter (X), Reddit, or niche communities.
While not a direct ranking factor, social engagement can drive traffic and bots to your page faster.
How To Check If Your Post Is Indexed?
The quickest way to check is to search the URL in Google.
If it shows up, it’s indexed.
But if it doesn’t, it’s either too new or there’s a crawl issue.
Keep in mind that Indexing isn’t instant.
New blog posts can take anywhere from a few hours to several days to appear in search results.
Re-indexing Updated Posts
To understand how to write a blog post effectively, you’ll also want to know how to maintain its performance.
Refreshing old posts (e.g., update stats, rewrite content) is a great idea to do so.
Just don’t forget to resubmit the blog post for indexing:
1. Republish the content with a new modified date to signal freshness.
2. Update your sitemap (if you’re managing it manually).
3. Use the URL Inspection Tool in Search Console to re-index the post.
Analytics Tools
To truly understand how your blog content performs, you need to track user behaviour, search visibility, and conversion data.
These tools offer essential insights:
Google Analytics (GA4)
It’s best for understanding user behaviour on your blog.
Google Analytics offers key features including, time on page, user journey, and conversion tracking.
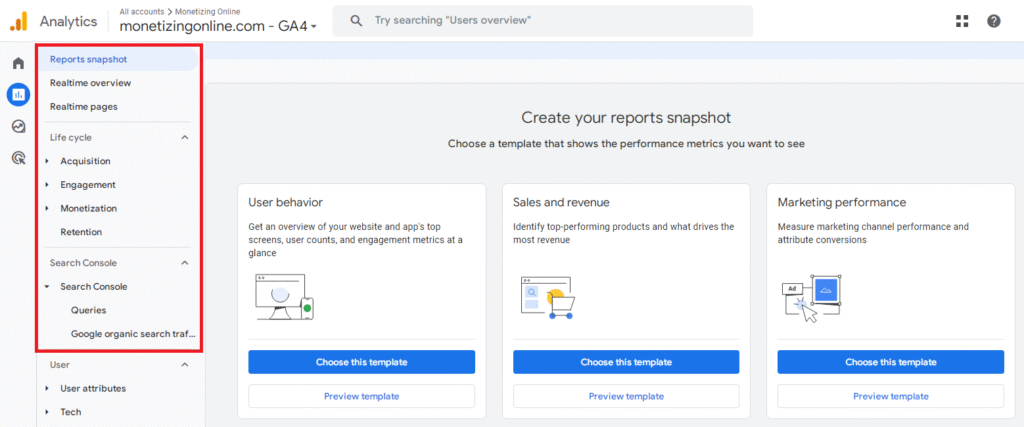
You can also see how many readers finish your blog post or which sections cause drop-offs.
Google Search Console
The platform is excellent for monitoring SEO performance and keyword visibility.
Some of its main features include, click-through rate (CTR), impressions, average position, crawl errors.
Use the tool to discover which search queries bring traffic to your post and optimize for low-hanging keywords.
Engagement Metrics To Watch
Knowing how to write a blog post is just the first step, understanding how it performs helps you refine your content strategy for better results.
Once tracking is set up, focus on key engagement metrics that signal how well your content is resonating with your audience:
Time on Page
- A high average time means readers are engaging.
- For a 1,500-word blog post, anything above 2.5–3 minutes is a good sign.
Scroll Depth
- Tools like Hotjar or plugins like Scroll Depth (on WordPress) show how far users read.
- If most people bounce before reaching your CTA, it might need repositioning.
Bounce Rate
- A high bounce rate (above 70%) may indicate that the content isn’t relevant or that load speed and readability need work.
CTR (Click-Through Rate)
- In Search Console, a CTR above 3–5% is healthy.
- If your post has high impressions but low CTR, consider rewriting the meta title and description.
Updating Old Posts

Content doesn’t stay fresh forever.
Over time, data becomes outdated, new trends emerge, and rankings shift.
Even evergreen topics like “How To Write A Blog Post” need amending.
That’s why, updating older posts is a smart way to regain SEO traction without creating new content from scratch.
When To Update:
- Traffic to the post has dropped by 30%+ over 3–6 months.
- Your content ranks on page 2 of Google (positions 11–20).
- The information is outdated, especially for tools, prices, or statistics.
How to Update:
- Audit the post by looking for outdated facts, broken links, or missing sections.
- Add new examples, expert quotes, or FAQs to enhance content depth.
- Optimize on-page SEO, refresh the meta title, and refine internal links.
- Republish, so you can change the publish date to reflect the update and resubmit to Google Search Console.
For example:
A blog post titled “Best Remote Work Tools For 2023” should be updated with 2025 tools, new screenshots, and fresh data, then republished with an updated year in the title.
Tracking and refining your content after publishing isn’t optional, it’s vital for high-performing blogs.
With the right tools and tactics in place, you can monitor your blog’s success but you can also actively shape it, post by post.
There you have it, the complete and detailed breakdown of how to write a blog post that’s engaging, optimized, and ready to drive real results.
If you haven’t already, set up your blog with Bluehost.
How To Write A Blog Post: Final Thoughts
In summary, we’ve covered every major step in creating a high-performing blog post, from planning and outlining, to SEO optimization, drafting with AI, editing, formatting, and finally, tracking its performance after publishing.
However, if you want to write the perfect blog post every time with ease, build repeatable systems.
Create reusable templates for outlines, meta tags, and formatting styles.
Also, make sure that you stick to a content calendar.
Publishing consistently is key to building momentum.
And finally, don’t stop iterating.
Watch which posts perform best and study why.
Experiment with structure, titles, CTA placement, or visuals to improve future content.
All the tips and tools in the world won’t help unless you put them into practice.
Don’t aim for perfection, instead aim for consistency.
The more blog posts you write, optimize, and publish, the more intuitive and effective the process becomes.
So, take what you’ve learned today about how to write a blog post, apply it to your next article, and iterate from there.
The best content creators aren’t writers, they’re systems thinkers, testers, and constant learners.
Now go create something worth clicking.
Launch you blog with Bluehost for just $2.95/month.
Disclaimer: This article contains affiliate links. If you sign up for a paid plan through my links, I may receive small compensation at no cost to you. You can read my affiliate disclosure by going to my privacy policy. This blog is for informational purposes only and does not constitute financial advice.
How To Write A Blog Post: Recommended Articles
If you want to keep sharpening your blogging skills, and keep growing your blog faster and smarter check out the recommended articles on MonetizingOnline.com: